This site uses cookies. By continuing to browse the site you are agreeing to our use of cookies. For more information, See our Privacy and Cookie Policy.
This function is disables on your cookie management.
To activate it, click on the link "Edit cookie settings" in the upper
right corner of this page.
We use cookies to offer you a convenient web browsing experience, to suggest personalized ads for you, and to keep improving functions through traffic analysis.
By clicking on ‘ACCEPT ALL’, you consent to our use of cookies. Click ‘Cookie Settings’ to choose whether to accept or disable certain cookies. To find out more, please read our Privacy Policy. | Cookie Settings
-
- Functional Cookies
-
These cookies are used to provide you with convenient functions, such as product reviews and product video playback, during your web browsing.
-
- Analytics Cookies
-
These cookies allows our website to keep improving functions through website traffic analysis and to suggest personalized content for you.
-
- Advertising Cookies
-
These cookies enable us to show you ads and other content that we think is most attuned to your interests and digital behavior.
This function is disables on your cookie management.
To activate it, click on the link "Edit cookie settings" in the upper
right corner of this page.

Heat pump Installation Guide: LG Therma V
-
Providing heat pump installation for customers as a service will certainly improve your business, but installation needs to be done right. According to the US Department of Energy, 70-90% of HVAC installations have at least 1 fault that compromises performance. Let’s go through the steps for LG Therma V R32 heat pump installation so we can get it right the first time.
-
Before Installation
When installing the Therma V R32 heat pump, there are a few things to check before getting started. First, check the model number on the packaging to be sure you have the right product. Also, give the packaging and product a look over to be sure there is no damage. The dimensions of the area where the product will be installed should be measured to be sure there is adequate space for proper system operation.


-
What’s In the Box?
Along with the outdoor and indoor units themselves, the packaging should also include the following:


-
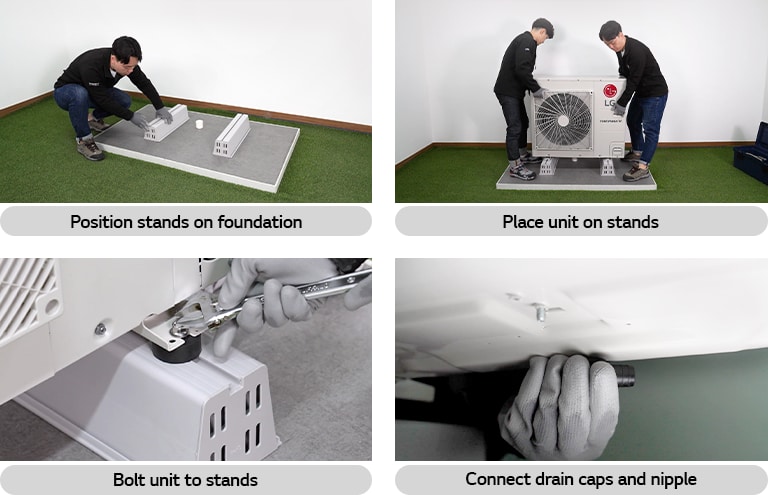
Mounting the Outdoor Unit
Make sure that the foundation where the outdoor unit will be installed is level. If the foundation is level, place the stands on the foundation. Next, lift the unit and place it on the stands. Once the unit is in place, fasten the unit to the stands. After the unit is mounted, insert the drain caps and nipple into the drain holes at the bottom of the unit.

-
Installing the Indoor Unit
Installing the indoor unit isn’t complicated but there are some things to prepare before attaching it to the wall. First, remove the remote-control case and disconnect the cable. Then, remove the front cover and detach the knock-out tab found at the bottom of the panel. Once you’ve applied the insulation to the front panel and base pan, it’s time to attach the indoor unit to the wall.


-
Measure the space where the indoor unit will be installed. Use the installation sheet to mark the points on the wall where the bolts will be positioned. Drill holes for the bolts and fasten the bolts into the holes. Now that the bolts are in place, attach the indoor unit to the bolts and fix it to the wall.


-
Installing the Refrigerant Piping
Now, it’s time to install the refrigerant piping. First, measure the distance between the outdoor unit and the indoor unit. Then, drill a hole in the wall for the piping to go through with a 70mm core drill. Make sure the hole is slanted downwards from inside to outside so that rain does not drip indoors. Uncoil the piping and cut it slightly longer than the measured distance. Next, wrap the piping and cables together with insulation and fasten them with tape.


-
Remove the flare nuts from the bottom of the indoor unit and set them aside. Tilt the piping downwards and remove burrs from the cut section so that they do not get inside the pipes. Put the flare nuts onto the pipes and flare the pipes. Align the pipes and connect them with the flare nuts using a torque wrench.


-
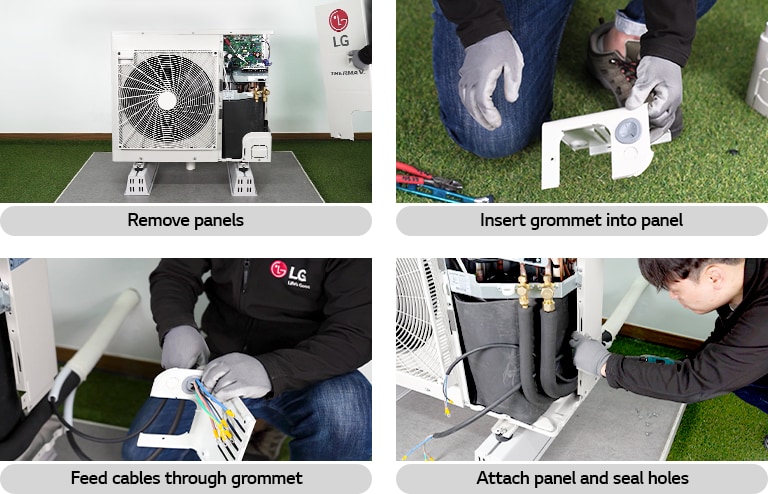
Remove the front and side panels of the outdoor unit. Once you have determined the direction the pipes will be facing, remove the flare nuts and prepare the pipes to be connected as with the indoor unit. Connect the pipes using the flare nuts. Next, remove the knock-out tabs for where the power and communication cables with be placed. Insert the grommet into the hole and feed the cables through it. Once the cables are connected, attach the panel and seal the hole with putty or another sealant.

-
With this guide, you’re already a step ahead of competitors for delivering heat pump installation service. For a detailed guide on installation of the Therma V R32 heat pump, refer to the video below.