Using camera modes
Record time-lapse videos
Tap  Camera and select Time-lapse by swiping camera modes.
See Timelapse Control for more details.
Recording a video
- Tap
 Camera and select Video by swiping camera modes.
 - Tap
 Record to record a video.
|
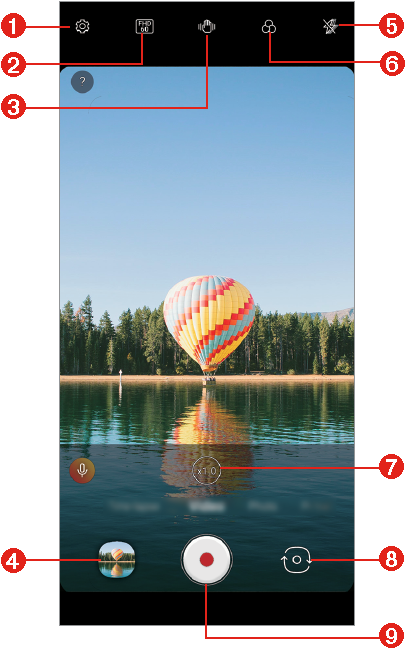
- Set camera options
- Select screen resolution
- Turn On/Off steady cam
- Preview
- Set/Cancel flash setting
- Apply filter effect
- Select zoom
- Switch to front-facing/rear-facing camera
- Record videos
- To take a photo while recording a video, tap
 Capture.
 - To pause the video recording, tap
 Pause. To resume the video recording, tap
  Record.
 - While recording a video, you may spread or pinch two fingers to zoom in or out.
- While recording a video, you may tap the desired area to adjust the brightness.
- You can switch to and from the front camera and rear camera while recording a video by pressing
 Swap.
Swap.
- Tap
 Stop to end the video recording.
Taking a photo
Tap  Camera and select Photo by swiping camera modes.
See Taking a photo for more details.
Taking portraits
You can take photos or videos that make the subject more distinct and stand out by blurring the background.
- Tap
 Camera and select Portrait by swiping camera modes.
- Select a desired effect by swiping effect options for portrait.
- Tap
 Aperture to adjust the aperture value.
- Tap
 Capture to take a photo, or tap and hold
  Capture to record a video.
- To pause the video recording, tap
 Pause. To resume the video recording, tap
  Record.
 - Tap
 Aperture to adjust the aperture value while recording a video.
|
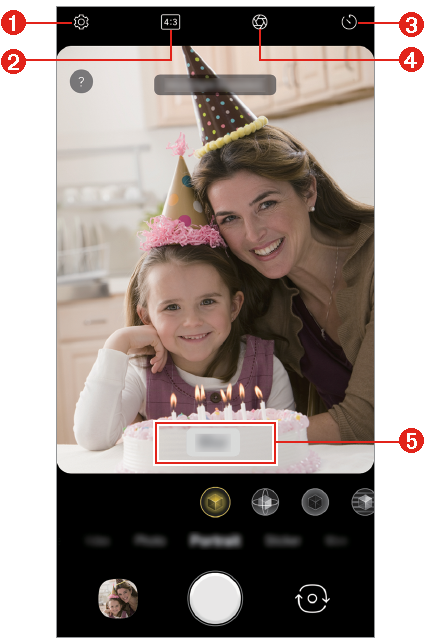
- Set camera options
- Choose screen ratio
- Set timer setting
- Set aperture value
- Adjust blur strength
- Tap
 Stop to end the video recording.
NOTES |
|
Using a sticker
Tap  Camera and select Sticker by swiping camera modes.
See 3D AR Effect for more details.
Using additional camera modes
Tap  Camera and select More by swiping camera modes.
Night view
You can take vivid and clear night photos. While taking a photo, hold the device steady. You can adjust photo brightness by dragging the slide bar left or right.
SeeNight view for details.
Panorama
You can create a panoramic photo by moving the camera in one direction to photograph and stitch continuous shots of a wide view.
- Tap
 Camera and select More by swiping camera modes.
 - Tap
 Panorama.
- Select a zoom from /
 .
.
- Tap
 Capture and then slowly move the camera in one direction.
- Move the device by following the direction of the arrow in the guideline.
- Tap
 Stop to stop capturing the panoramic.

|
- Set camera options
NOTE | When moving the camera in one direction, make sure that the screen you shoot is not out of the guide line. |
Manual Camera
You can create photos featuring professional touch by using a variety of advanced features.
- Tap
 Camera and select More by swiping camera modes.
 - Tap
 Manual Camera.
 - Customize the following camera settings.
- Select a zoom from /
 /
/ .
.
- If you select Auto, the options are automatically adjusted according to the shooting target and environment.
- If the Focus option is selected, the focused area is highlighted in color. This feature is available only in Manual Focus (MF) mode.
|
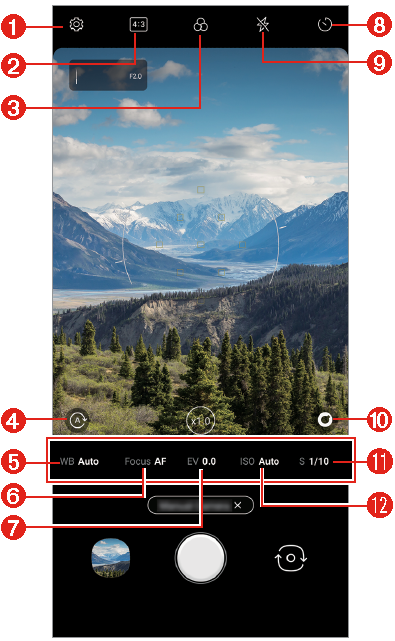
- Set camera options
- Choose screen ratio
- Apply filter effect
- Reset the settings
- Adjust white balance
- Adjust focus
- Adjust brightness
- Set timer setting
- Set flash setting
- Displays various Graphy options
- Adjust shutter speed
- Adjust ISO speed
- Tap
 Capture to take the photo.
NOTES |
|


Customizing the camera options
You can customize a variety of camera options to suit your preferences.
Tap  Settings on the screen.
Photo size | Select values for aspect ratio and size for taking photos. |
Save as RAW | The image is stored as a RAW file format so that you can modify it. The DNG and JPEG files are created while taking a photo, then saved as a non compressed high resolution image. |
Graphy photos | Adjusts the white balance, ISO and shutter speed for the recommended photo. |
Shutter sound | You can turn on or off the camera shutter sound while taking a photo. |
Tracking focus | Enables the camera to remain focused on the subject you touch on the screen, even if the subject is moving. (Available when the Standard camera is in use.) |
Guide | Displays guide grids so that you can take photos based on the horizontal and vertical reference lines. |
Add signature | Displays a personalized signature on the photos. |
Tag locations | Saves the image with GPS location data. |
Help | Provides help information for each camera menu. |
Manual Video
You can manually set various functions for recording a video.
Adjust audio, white balance, focus, brightness, ISO, shutter speed, etc.
- Tap
 Camera and select More by swiping camera modes.
 - Tap
 Manual Video.
 - Set the options that are appropriate for the shooting environment.
- Select a zoom from /
 /
/ .
.
|
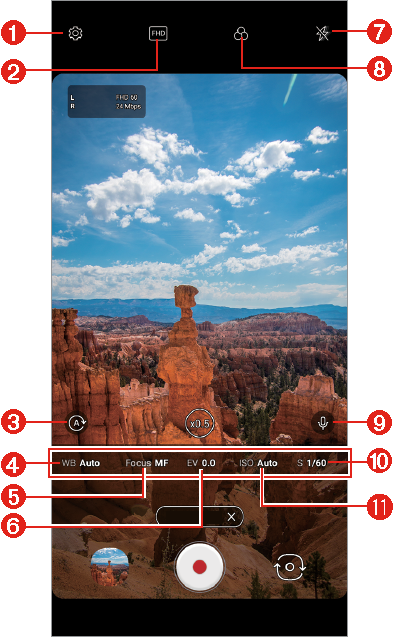
- Set camera options
- Choose screen ratio
- Reset the settings
- Adjust white balance
- Adjust focus
- Adjust brightness
- Set flash setting
- Apply filter effect
- Set microphone
- Adjust shutter speed
- Adjust ISO speed
- Tap
 Record to start recording.
- To pause the video recording, tap
 Pause. To resume the video recording, tap
  Record.
NOTES |
|


Slo-mo
You can create an entertaining video by changing the moving speeds of subjects in your video. This feature allows you to record a video at a faster rate of speed and then play it at the standard speed so that the video appears to be slowed down.
- Tap
 Camera and select More by swiping camera modes.
 - Tap
 Slo-mo.
- Select a zoom from /
 /
/ .
.
- Select an interval
 Part Slo-mo or entire
  All Slo-mo to apply the slow motion effect to it.
- Part Slo-mo: Allows you to apply a slow motion effect to a specific section of the video.
- y Tap
 Slo-mo at the moment where you want the slow motion effect to be applied. With a short-press, slow motion effect will be applied for 0.5 second. With a long-press, slow motion effect will be applied until you release your finger.
 - All Slo-mo: Allows you to apply a slow motion effect to the entire video.
|
|

- Tap
 Record to start recording.
- To pause the video recording, tap
 Pause. To resume the video recording, tap
  Record.
- If you want to finish shooting, tap
 Stop.
Stop.
YouTube Live
You can record a video and directly upload to YouTube.
- On the home screen, tap
 Camera.
 - Select More by swiping camera modes, then tap
 YouTube.
NOTES |
|